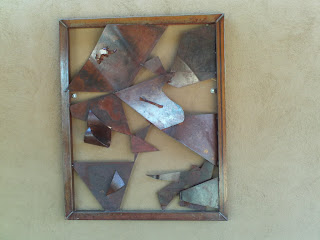
There are so many ways to create your own wall art even if you have no artistic ability whatsoever! Let's take a look at some of the fun and inexpensive ways you can add visual interest to your home.
3D metal wall art is becoming increasingly popular, bringing with it the ability to create real impact. Making 3D metal wall art yourself, needn't be complicated. Start with a framework of metal rods from the hardware store, simply soldered together in a grid-like formation. Next, cut off the tops and bottoms of washed out drinks cans, and cut down the side. Lay them out to create a metal sheet. Cut out a simple design from paper to use as a template, and then cut round the drinks can metal sheet. You can use more than one "sheet" and glue them together. Secure these metal pieces to the metal framework using a glue gun, and wire, wrapped around the frame - Simple DIY metal wall art for little cost and huge impact!
You can also cheat and create the illusion of 3D metal art for your walls, by decorating with branches and twigs, and spray painting them a metallic color to be hung on the walls.

Paper Art
When creating wall art, DIY treatments come no easier than utilizing great patterns and designs that already exist. Wallpaper can be cut into squares or long rectangles, and either framed or stuck onto an existing canvas. Scrapbook paper already comes in square sizes of 6, 8, and 12-inch varieties, so you don't even need to do any cutting! Try framing with a felt border, or print your own paper.
Ink stamping wall art, is another great option for those of us that can't draw (as in using wall stencils). Using an archival ink pad and a rubber/acrylic stamp, you have the ability to create detailed designs that you still have control over. Stamp directly onto blank canvas, or use lining paper, cut to shape and then display in a box frame.
Or why not go back to your childhood, with a bit of cutting and sticking! Tear strips of different papers, and apply the strips vertically next to each other. Apply directly to canvas, and seal with a clear varnish to protect the torn paper edges.
Put Paint to Canvas
Putting paint to canvas is an easy way to make unique wall art yourself. These pictures show that, you don't have to be an artist, or create a complicated design in order for the idea to work. This design utilizes three separate canvases, flowing from one to another (called a triptych).
Geometric shapes work well when creating your own canvas wall art, and you can sketch out an idea in pencil onto the canvas, or work freely. Although these designs use acrylic paints, even tester pots of regular paint will work, although you might need to water them down, to allow for easier blending.
You can also use geometric shapes to make up a larger image, so think mosaic style with small squares, or use the aboriginal style of artwork (pictured) and use circles for something curvy and unique.
Or, ditch any idea of shape and form, and go crazy with a freeform drip and splatter painting - whatever look works for your room.
Project Your Ideas
Hiring an overhead projector, and projecting a design onto the wall to be copied, shows that DIY wall art doesn't have to be framed. You could try using ink stamps, or create your own image with a permanent pen onto acetate, thus giving a larger design on the wall with the use of the projector. Or use a favorite phrase displayed in an antique font - a quote from Shakespeare or Homer Simpson, the choice is yours.
Project the chosen design onto the wall, and adjust the distance and focus to get the size image you require. Then trace the design onto the wall with a pencil, before filling in with paint. Add highlights and shadows to add extra depth and dimension to the finished creation.
Get Tactile with Fabrics
Using fabric as wall art is a great DIY trick to make a color scheme come together in a room. You can reuse old blankets, curtains, or even bed heads as fabric wall hangings. Either hang them plain, or add details like buttons, sequins and embroidery. Use a few yards of new patterned fabric, and attach it to a blank canvas, or back it onto mountboard with an iron-on adhesive for a quick fix wall hanging.
The fabric wall art pictured here was achieved by stitching two contrasting lengths of fabric together, that had been machine embroidered. The whole piece was then stretched over a wooden frame, and secured with staples at the back. For added effect, you could quilt the fabric before attaching to the frame. A perfect example that shows when creating wall art, DIY gives you the freedom to match art to your decor perfectly.
http://amigosparasiempre4.blogspot.co.uk


0 komentar:
Posting Komentar